
1- How to Generate Engine Using tlt-converter?
2- How to Deploy the Model in Deepstream?
Hardware: DSBOX-NX2
OS: Jetpack 4.5
In this blog post, we will show how to integrate custom segmentation model that we previously trained using NVIDIA® Transfer Learning Toolkit into Jetson™ modules with Deepstream. To learn how to train a custom segmentation model with transfer learning toolkit, click here.
Before we get started, you should download tlt-converter to generate an engine and ds-tlt-segmentation to test the model.
To install tlt-converter go to the following page, download and unzip the zip file for Jetpack 4.5:
https://docs.nvidia.com/metropolis/TLT/tlt-user-guide/text/tensorrt.html#tlt-converter-matrix
You need to install OpenSSL package as well.
sudo apt-get install libssl-dev
Export the following environment variables.
export TRT_LIB_PATH=”/usr/lib/aarch64-linux-gnu”
export TRT_INC_PATH=”/usr/include/aarch64-linux-gnu”
To install ds-tlt, go to following GitHub post and download deepstream-tlt-apps according to the instructions. You do not need to download models since we will use our own model.
https://github.com/NVIDIA-AI-IOT/deepstream_tlt_apps#2-build-sample-application
Make sure you have exported models that we previously trained.
Now, we will generate an engine using tlt-converter. You can find the usage of tlt-converter by running the following command.
./tlt-converter -h
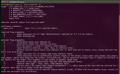
We will show the steps for each exported model (fp16, fp32 and int8).
Fp16 model:
cd exported_models/fp16/
/home/nvidia/tlt-converter -k forecr -p input_1,1x3x320x320,2x3x320x320,3x3x320x320 segmentation_model_fp16.etlt -e fp16.engine -t fp16
Fp32 Model:
cd exported_models/fp32/
/home/nvidia/tlt-converter -k forecr -p input_1,1x3x320x320,2x3x320x320,3x3x320x320 segmentation_model_fp32.etlt -e fp32.engine -t fp32
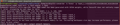
Int8 Model (do not forget to add calibration cache file):
cd exported_models/int8/
/home/nvidia/tlt-converter -k forecr -p input_1,1x3x320x320,2x3x320x320,3x3x320x320 segmentation_model_int8.etlt -e int8.engine -t int8 -c cal.bin
Before running ds-tlt, we need to make changes on the Make files.
Set NVDS_VERSION:=5.1 in apps/Makefile and post_processor/Makefile.
Now, you can set the CUDA version and run Make files.
export CUDA_VER=xy.z                   // xy.z is CUDA version, e.g. 10.2
make
Also, go to deepstream source code and change input/output dimensions according to your model. For example, for Resnet18-3 channel model set the following.
#define MODEL_OUTPUT_WIDTH 320
#define MODEL_OUTPUT_HEIGHT 320
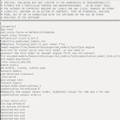
Finally, you can run ds-tlt-segmentation to test the model. Supported formats for the test input are jpeg and h264. You can use the sample videos and pictures that comes with deepstream, under opt/nvidia/deepstream/deepstream-5.0/samples/streams.
./apps/tlt_segmentation/ds-tlt-segmentation -c configs/unet_tlt/pgie_unet_tlt_config.txt -i streams/sample_720p.jpeg
Thank you for reading our blog post.