Training a Custom Object Detection Model with YOLOv5
WHAT YOU WILL LEARN?
ENVIRONMENT
Operating System: Ubuntu 18.04.5 LTS
CPU: AMD Ryzen 7 3700X 8-Core Processor
RAM: 32 GB DDR4 - 2133MHz
Graphic Card: RTX 2060 (6GB)
Graphic Card’s Driver Version: 460.39
Setting up the Docker container
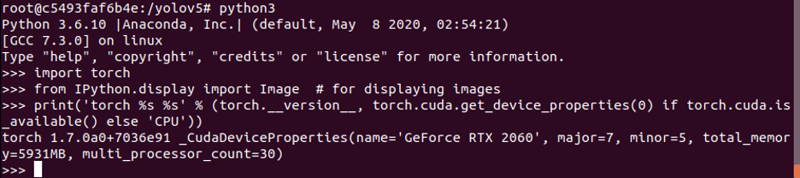
In this tutorial, we used YOLOv5 repository to train our custom masked face dataset with NVIDIA Container Toolkit. First of all, we will set our Docker environment and check GPU support with Python3. Secondly, we will set dataset in our mutual YOLOv5 folder (available between host PC and temporary Docker container). Finally, we will train the dataset with YOLOv5m weight file.
Configuring the dataset
To begin with, let's download the YOLOv5 repository and set the PyTorch container (with the same docker version) up to train masked face dataset.
docker --version

git clone https://github.com/ultralytics/yolov5.git
docker pull nvcr.io/nvidia/pytorch:20.10-py3
docker run -it --rm --gpus all -v ${PWD}/yolov5:/yolov5 nvcr.io/nvidia/pytorch:20.10-py3
cd /yolov5/
sed -i "s/opencv/#opencv/g" requirements.txt
sed -i "s/torch/#torch/g" requirements.txt
apt update && apt install -y zip htop screen libgl1-mesa-glx
apt install -y python3-opencv
pip3 install --upgrade pip
pip3 install --no-cache -r requirements.txt
python3
Dataset Configuration
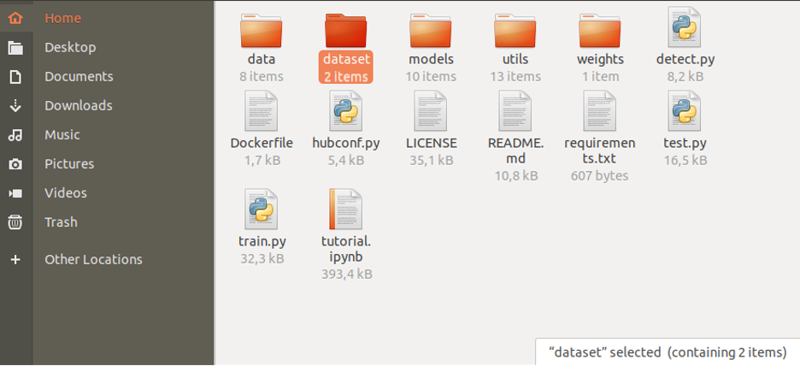
Then, create "dataset" folder and move training and validation dataset into it.
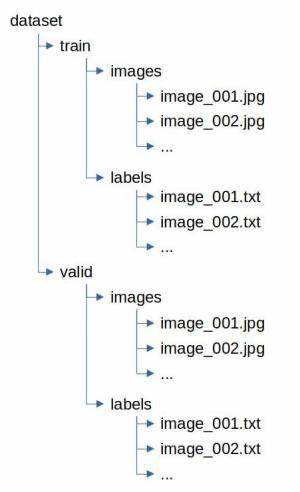
Now, let's create and configure ".yaml" files. Our dataset has two classes, so that we set "nc" constants as 2 and names array as "Mask" and "Without_mask".
touch data.yaml
echo "train: /yolov5/dataset/train/images" > data.yaml
echo "val: /yolov5/dataset/valid/images" >> data.yaml
echo "nc: 2" >> data.yaml
echo "names: ['Mask', 'Without_mask']" >> data.yaml
cp models/*.yaml .
sed -i "s/nc: 80/nc: 2/g" yolov5*.yaml

Furthermore, download weights into the weights folder:
cd weights/
bash download_weights.sh
cd ..

Dataset Training
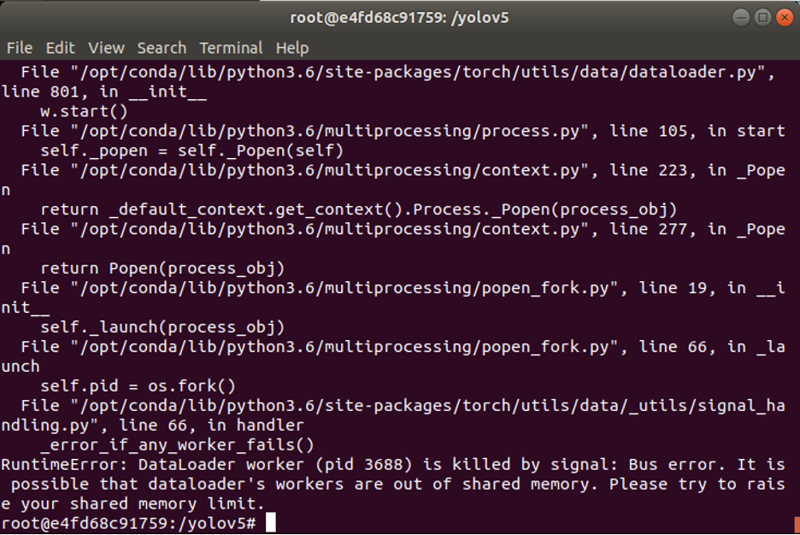
In our setup, we trained with 100 epochs but you can increase that to get more stable results. We started training batch size with 16 but our GPU's memory was not enough to train (In your setup, this may run due to your dataset). So that, we decreased batch size step-by-step (16,8,4,2,1). If we use more batch sizes, you may see this error:
cd /yolov5/python3 train.py --img 608 --batch 2 --epochs 100 --data '/yolov5/data.yaml' --cfg /yolov5/yolov5m.yaml --weights '/yolov5/weights/yolov5m.pt' --cache
A few moments later...

After the training ended...

Our weight file saved into runs/train/exp10 folder:

Our result graphics are into runs/train/exp10/results.png file:

Now, let's test our weight file:
cd /yolov5/
python3 detect.py --weights runs/train/exp10/weights/best.pt --img 416 --conf 0.4 --source /yolov5/dataset/valid/images

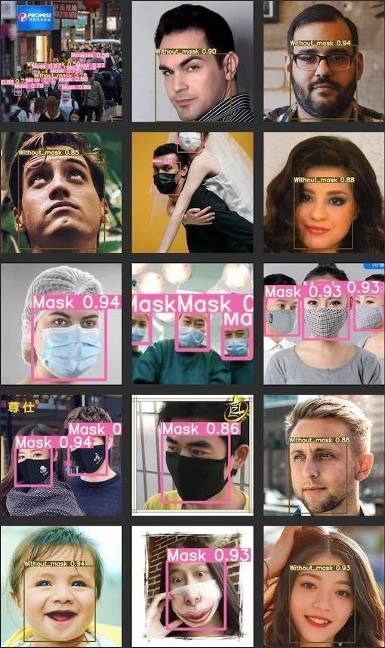
Test results saved to runs/detect/exp. Let's check some results:

You can also train with other weights (YOLOv5s, YOLOv5l, YOLOv5x) to use your model in powerful or minimal environments. It's up to you.
For example if you want to train with the YOLOv5s model, you can train with this command:
python3 train.py --img 608 --batch 2 --epochs 100 --data '/yolov5/data.yaml' --cfg /yolov5/yolov5s.yaml --weights '/yolov5/weights/yolov5s.pt' --cache
Thank you for reading our blog post.