How to Clone NVIDIA Jetson with its External Drive?
ENVIRONMENT
Hardware 1: Corsair Gaming PC
OS 1: Ubuntu-18.04Hardware 2: DSBOX-NX2 with SSD Drive
OS 2: JetPack-4.6
In this tutorial, we will get backup images on NVIDIA Jetson module with its external storage. First, we will create the Jetson OS image on host PC. Then, we will get the external storage's backup. Afterwards, we will get the internal storage’s backup. Finally, we will restore them in another device.
Attention:This tutorial prepared for DSBOX-NX2 with SSD drive but it will work on another configurations which root file-system storage transfered with NVME SSD transfer guide or SD card transfer guide. Only the device selection, storage names etc. differs on it.
Creating the Jetson OS Image
Open the NVIDIA SDK Manager. Select the Target Operating System and the Target Hardware (The “Host Machine” components are not required). (In our side we selected “JetPack 4.6” for operating system and “Jetson Xavier NX modules” for hardware.) Then continue to Step 2.

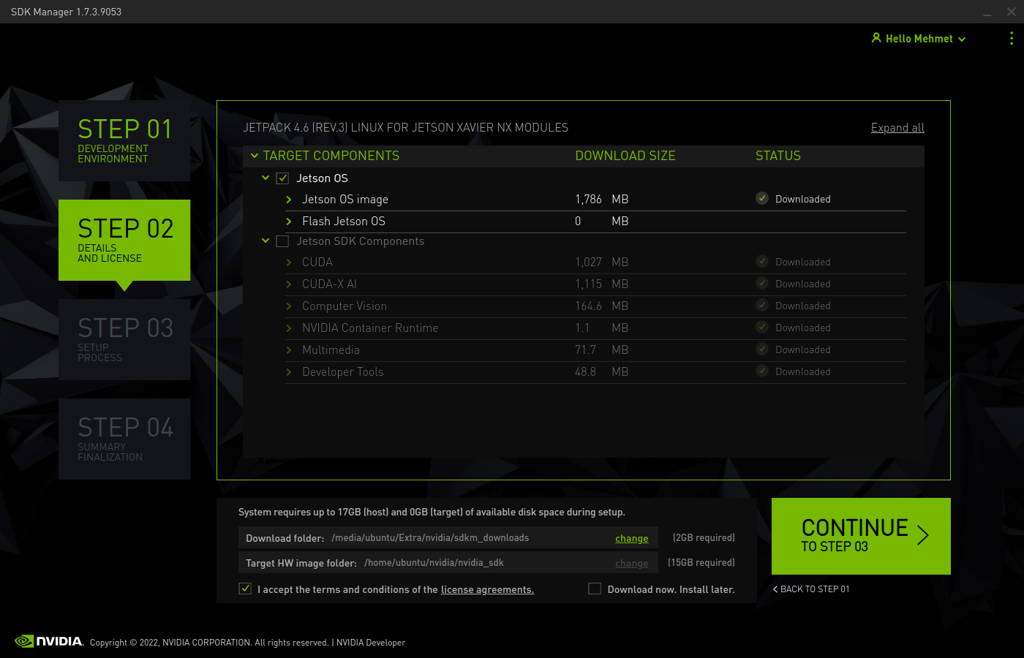
Choose only “Jetson OS”, accept the terms & conditions and continue to Step 3.
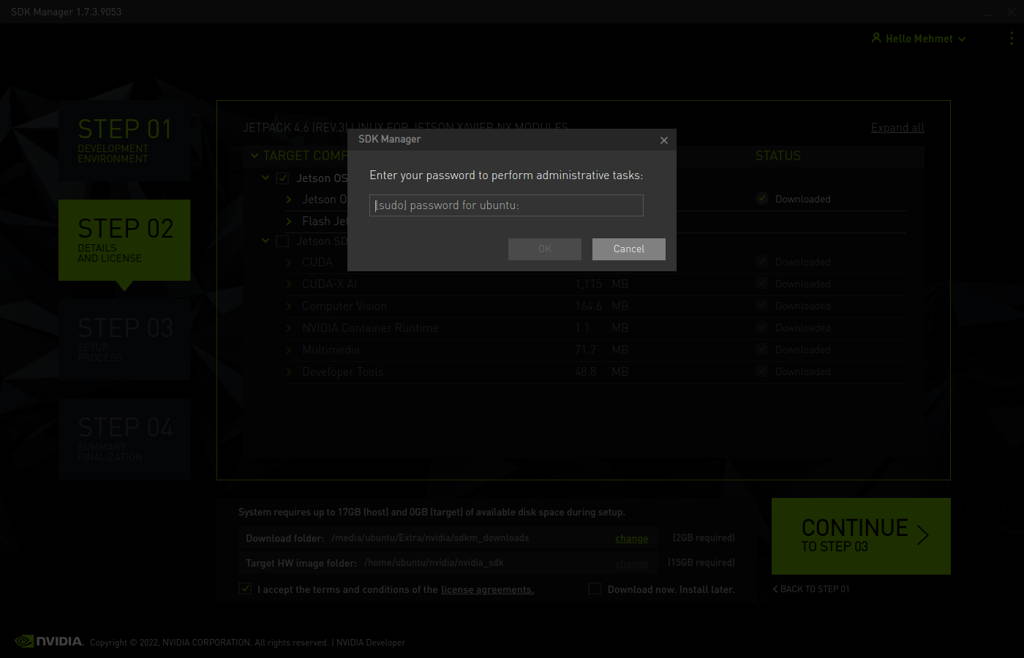
The SDK Manager will ask the username’s password. Fill it and continue.

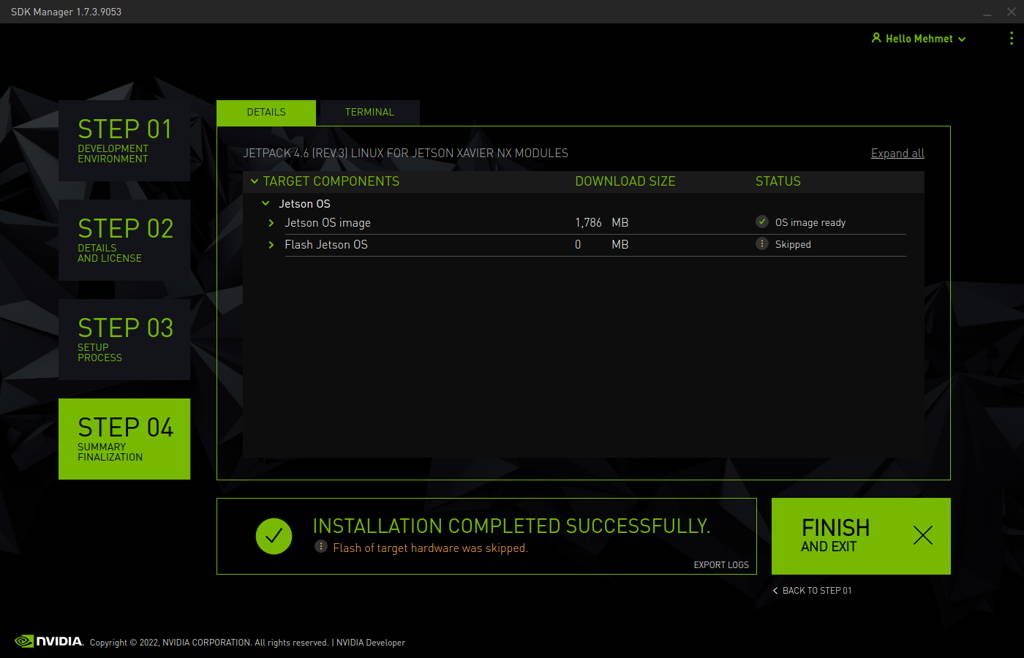
After the Jetson OS has created, the SDK Manager asks the Jetson module’s flashing style. Just skip it and exit from the SDK Manager.

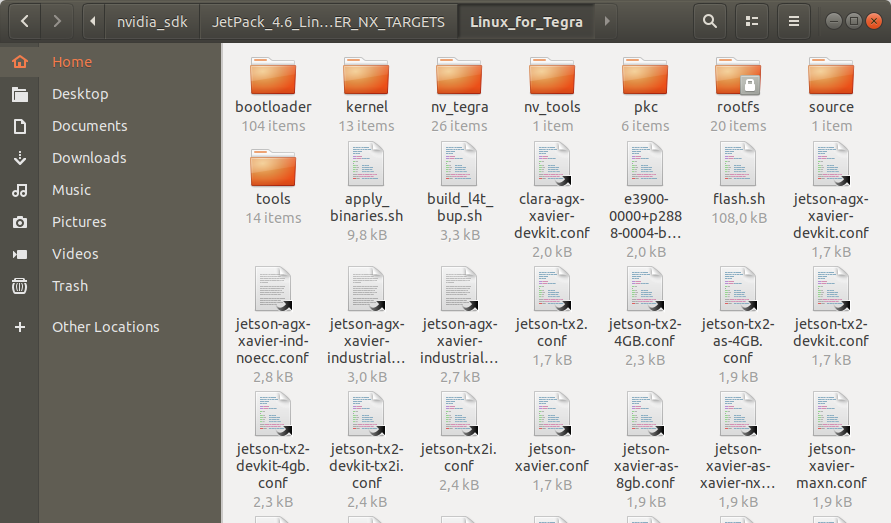
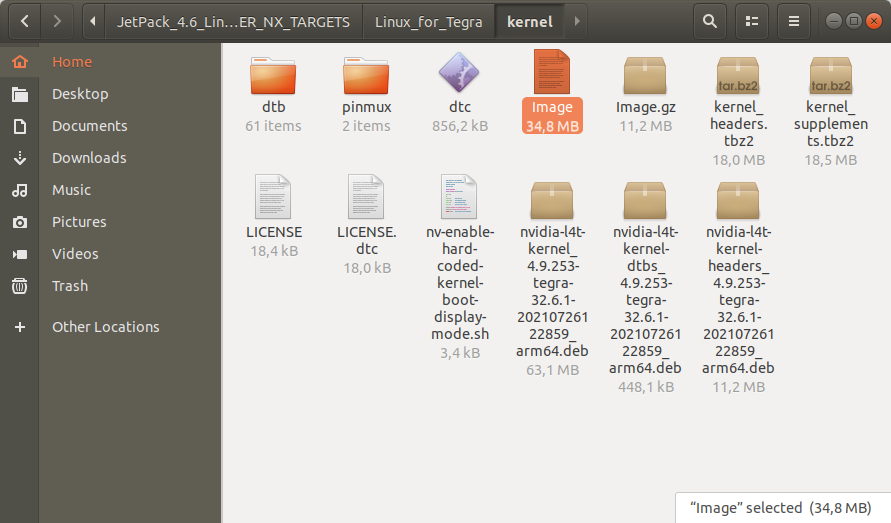
Open the target HW image folder. (In our side, it’s located on ${HOME}/nvidia/nvidia_sdk/JetPack_4.6_Linux_JETSON_XAVIER_NX_TARGETS/Linux_for_Tegra/)
Download the BSP files from GitHub and extract it.
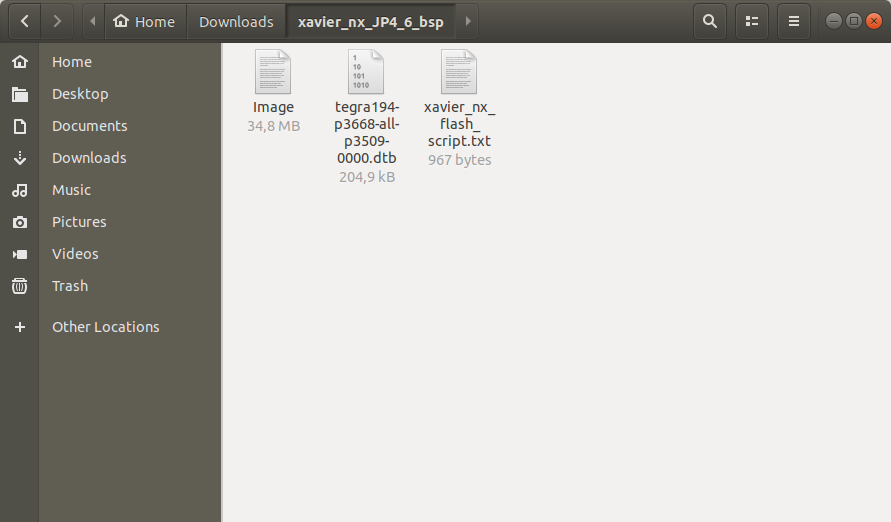
Copy the “Image” file from the extracted folder to the “kernel” folder.
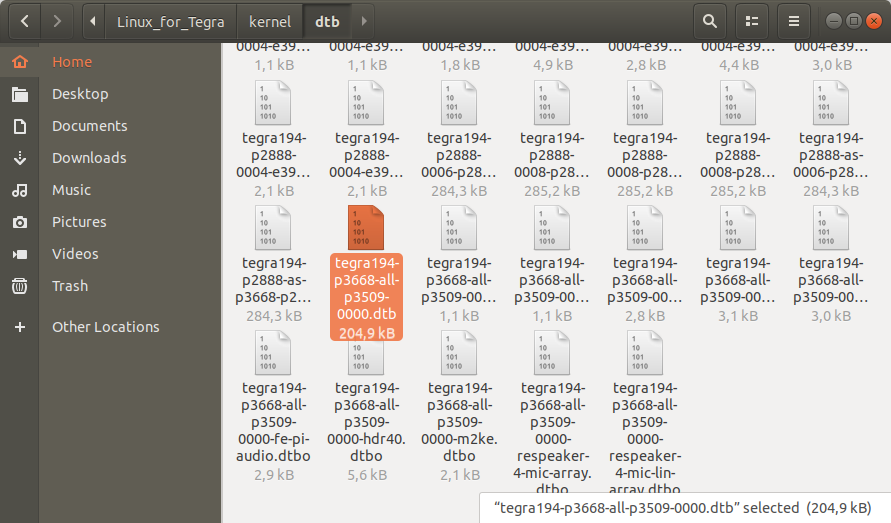
Then copy the DTB file into the “kernel/dtb” folder (The DTB file name changes for each type of Jetson module).
Attention: For DSBOARD-NX2 with TX2 NX module, there is an extra file (tegra186-bpmp-p3636-0001-a00-00.dtb) to locate it on “Linux_for_Tegra/bootloader/t186ref/” path.
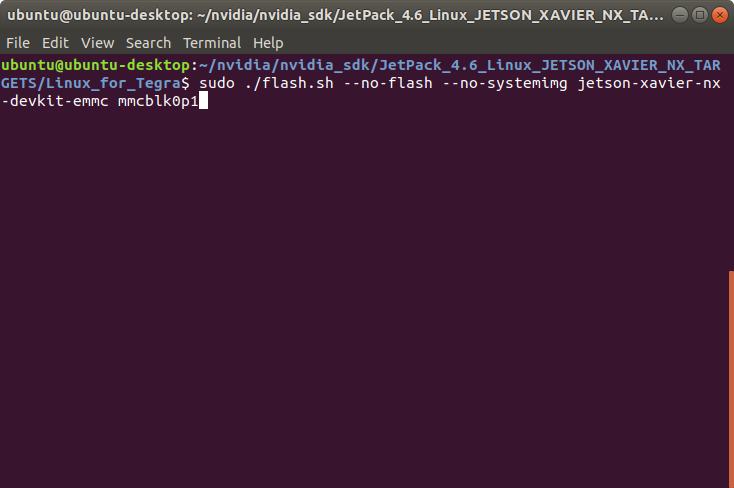
Return to the “Linux_for_Tegra” folder and open a Terminal.

Then, create the essential binaries.
• For AGX Xavier module, type this command below:
sudo ./flash.sh --no-flash --no-systemimg jetson-xavier mmcblk0p1
• For AGX Xavier Industrial module, type this command below:
sudo ./flash.sh --no-flash --no-systemimg jetson-agx-xavier-industrial mmcblk0p1
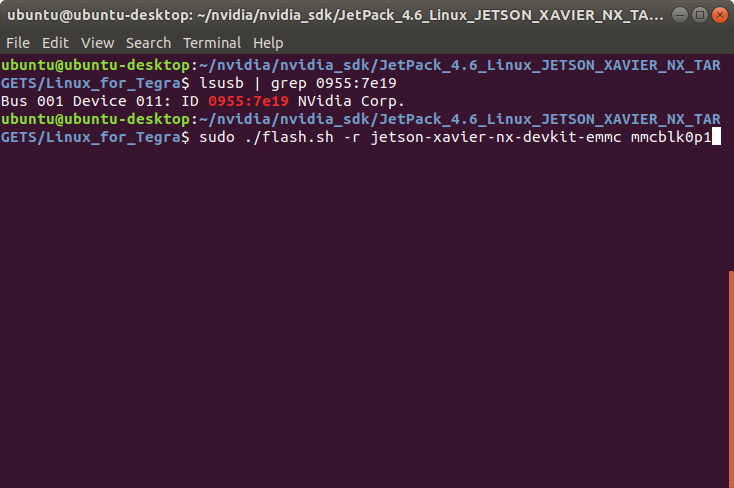
• For Xavier NX module, type this command below:
sudo ./flash.sh --no-flash --no-systemimg jetson-xavier-nx-devkit-emmc mmcblk0p1
• For TX2 NX module, type this command below:
sudo ./flash.sh --no-flash --no-systemimg jetson-xavier-nx-devkit-tx2-nx mmcblk0p1
• For Nano module, type this command below:
sudo ./flash.sh --no-flash --no-systemimg jetson-nano-emmc mmcblk0p1
A few seconds later …
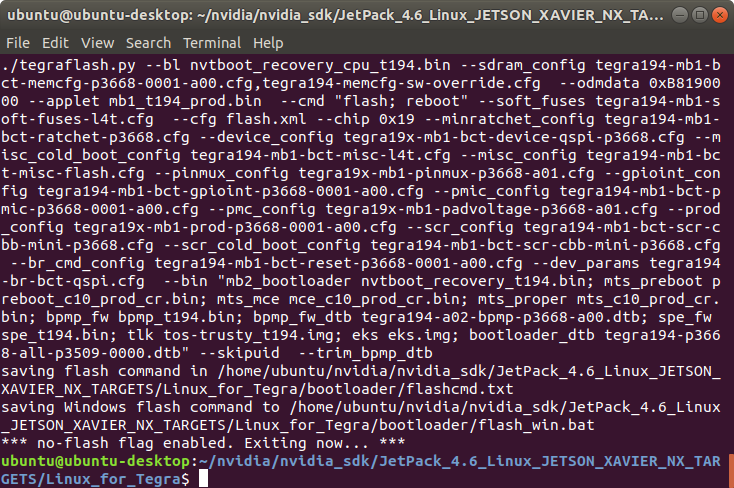
After the script ended, the required binaries created. Let’s get the backup images.
Getting the External Storage’s Backup
Connect the power connector & Ethernet cable to power on the Jetson and connecting it via SSH connection.
Get the Jetson module’s IP address (from an IP scanner app, or typing “ifconfig” on the module). Connect it via SSH connection and check the external storage mounted successfully.
ssh {USERNAME}@{IP_ADDRESS}
df -h
We typed these commands below (username:nvidia, IP address: 192.168.2.115 ):
ssh nvidia@192.168.2.115
df -h


As you can see that the external storage (NVME drive - /dev/nvme0n1p1) mounted as file system (/).
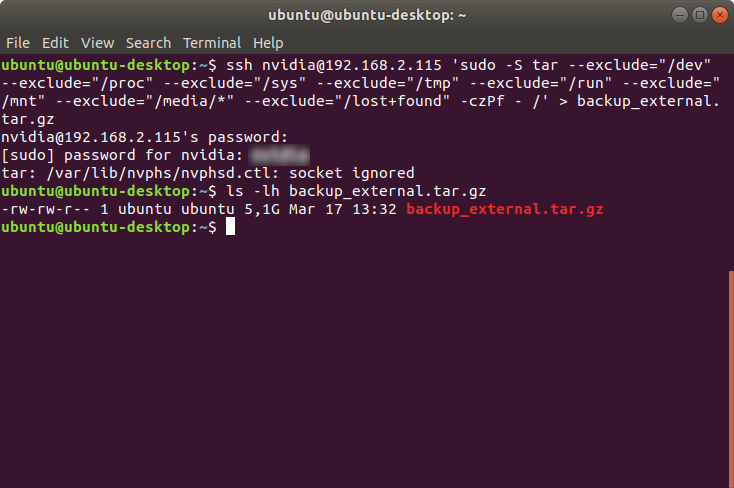
Then, return to the host PC and get all files from external drive to a tar archive (located on host PC).
ssh {USERNAME}@{IP_ADDRESS} 'sudo -S tar --exclude="/dev" --exclude="/proc" --exclude="/sys" --exclude="/tmp" --exclude="/run" --exclude="/mnt" --exclude="/media/*" --exclude="/lost+found" -czPf - /' > backup_external.tar.gz
We typed this command below (username:nvidia, IP address: 192.168.2.115):
ssh nvidia@192.168.2.115 'sudo -S tar --exclude="/dev" --exclude="/proc" --exclude="/sys" --exclude="/tmp" --exclude="/run" --exclude="/mnt" --exclude="/media/*" --exclude="/lost+found" -czPf - /' > backup_external.tar.gz
Getting the Internal Storage’s Backup
If you don’t need to get the internal storage’s backup. You can create the default image, delete the Sparse image with these commands below and continue to the “Restoring on Another Device” section.
• For AGX Xavier module, type these commands below:
sudo ./flash.sh --no-flash jetson-xavier mmcblk0p1
rm -f bootloader/system.img
• For AGX Xavier Industrial module, type these commands below:
sudo ./flash.sh --no-flash jetson-agx-xavier-industrial mmcblk0p1
rm -f bootloader/system.img
• For Xavier NX module, type these commands below:
sudo ./flash.sh --no-flash jetson-xavier-nx-devkit-emmc mmcblk0p1
rm -f bootloader/system.img
• For TX2 NX module, type these commands below:
sudo ./flash.sh --no-flash jetson-xavier-nx-devkit-tx2-nx mmcblk0p1
rm -f bootloader/system.img
• For Nano module, type these commands below:
sudo ./flash.sh --no-flash jetson-nano-emmc mmcblk0p1
rm -f bootloader/system.img
Otherwise, you can continue to the following steps if you wanted to get the internal storage’s backup.
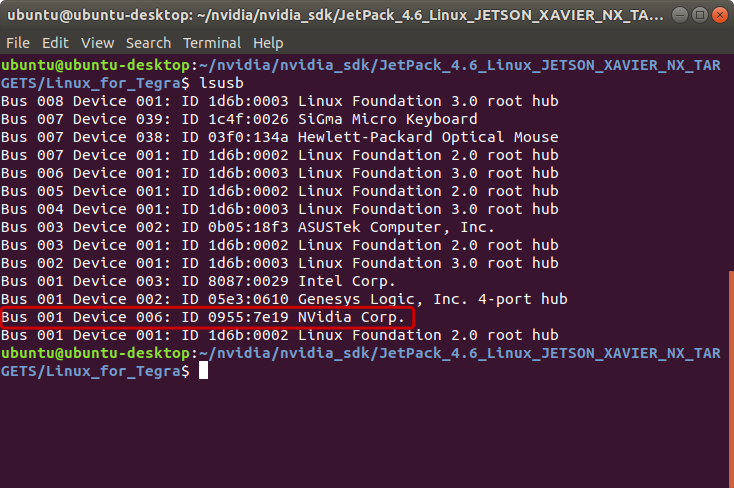
Open a terminal into the Target Hardware Image Folder and set your Jetson module in recovery mode. Type “lsusb” to check the Jetson connected in recovery mode.
• For AGX Xavier module, type this command below:
lsusb | grep 0955:7019
• For AGX Xavier Industrial module, type this command below:
lsusb | grep 0955:7919
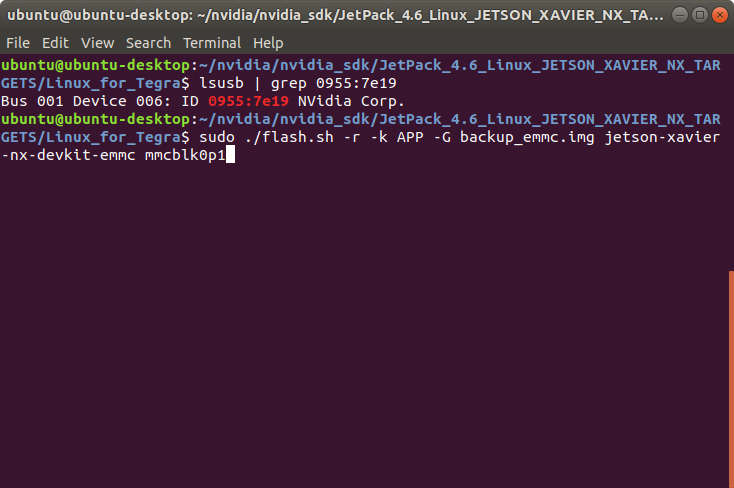
• For Xavier NX module, type this command below:
lsusb | grep 0955:7e19
• For TX2 NX module, type this command below:
lsusb | grep 0955:7c18
• For Nano module, type this command below:
lsusb | grep 0955:7f21

Then, create the internal storage's backup image.
• For AGX Xavier module, type this command below:
sudo ./flash.sh -r -k APP -G backup_emmc.img jetson-xavier mmcblk0p1
• For AGX Xavier Industrial module, type this command below:
sudo ./flash.sh -r -k APP -G backup_emmc.img jetson-agx-xavier-industrial mmcblk0p1
• For Xavier NX module, type this command below:
sudo ./flash.sh -r -k APP -G backup_emmc.img jetson-xavier-nx-devkit-emmc mmcblk0p1
• For TX2 NX module, type this command below:
sudo ./flash.sh -r -k APP -G backup_emmc.img jetson-xavier-nx-devkit-tx2-nx mmcblk0p1
• For Nano module, type this command below:
sudo ./flash.sh -r -k APP -G backup_emmc.img jetson-nano-emmc mmcblk0p1
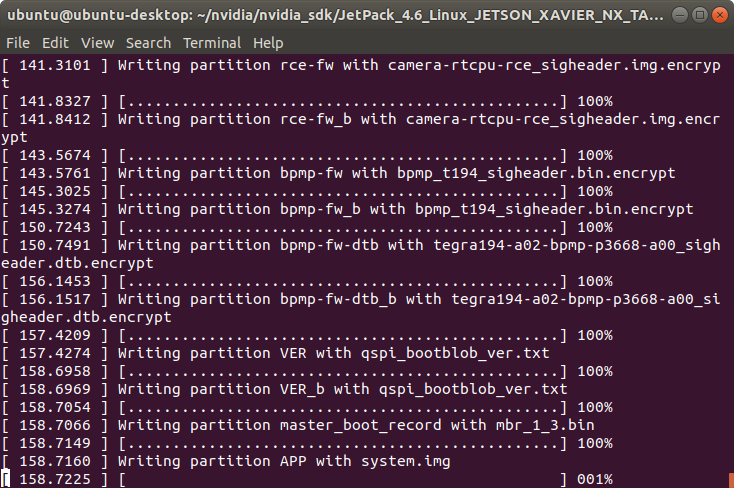
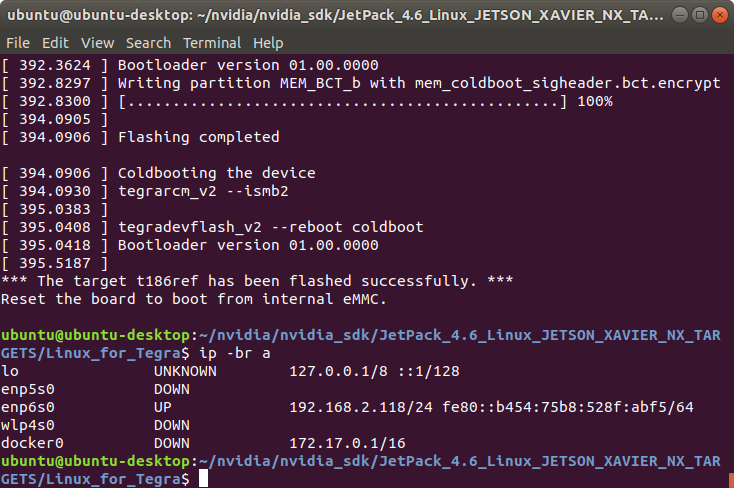
After typing the clone command into the terminal, the processes look like this:

At the end of the clone command, the “backup_emmc.img.raw” file was saved and the “backup_emmc.img” file was created. (Both files can be able to use for restoring. The “.img.raw” file is configurable but it is bigger than “.img” file)
ls -lh backup_emmc.img*

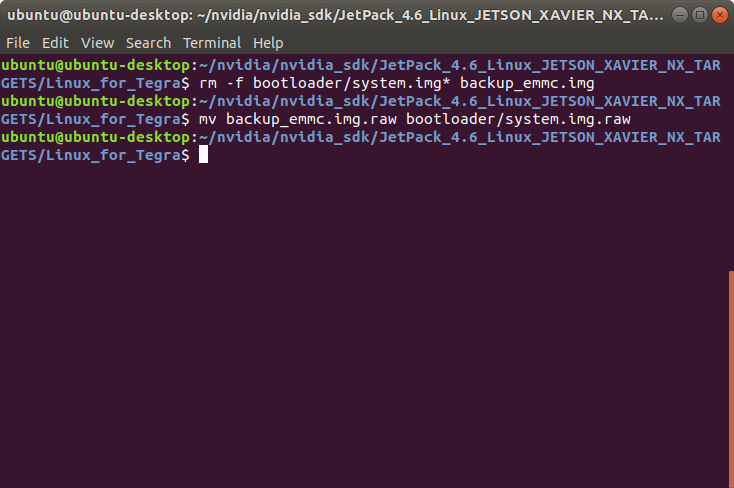
Remove the default system images (if it created before) and the Sparse backup image. Then, move the RAW image in the Linux_for_Tegra/bootloader folder.
rm -f bootloader/system.img* backup_emmc.img
mv backup_emmc.img.raw bootloader/system.img.raw
Configuring the Internal Storage’s Backup
At this part, we will configure (if you got internal storage’s backup) the internal image.
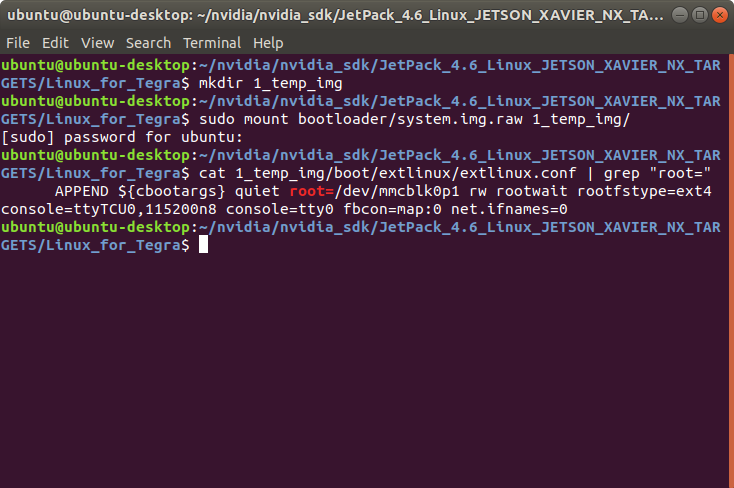
First, make a template directory and mount the image file on it. Then, check the “root” parameter on the extlinux.conf file.
mkdir 1_temp_img
sudo mount bootloader/system.img.raw 1_temp_img/
cat 1_temp_img/boot/extlinux/extlinux.conf | grep "root="
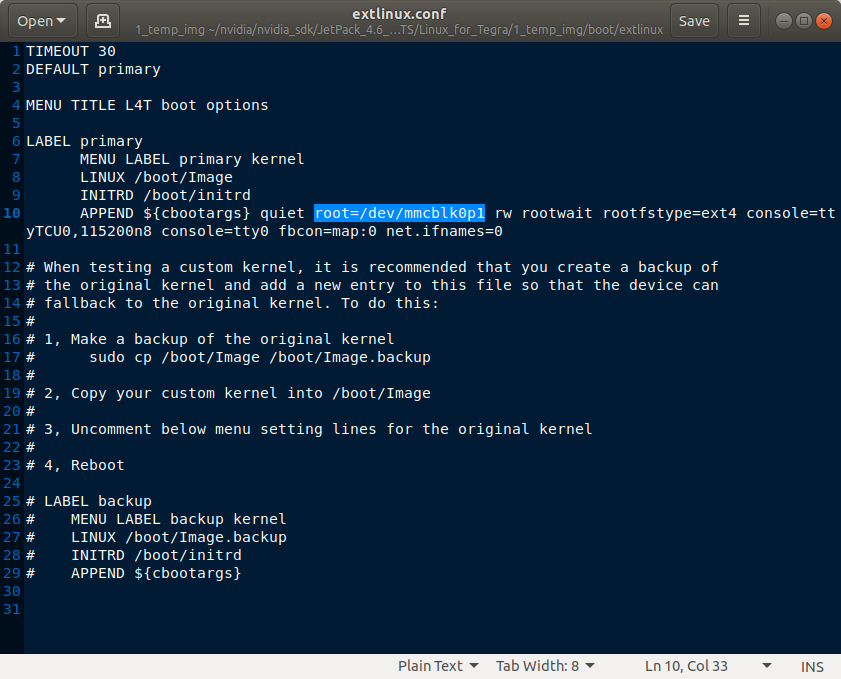
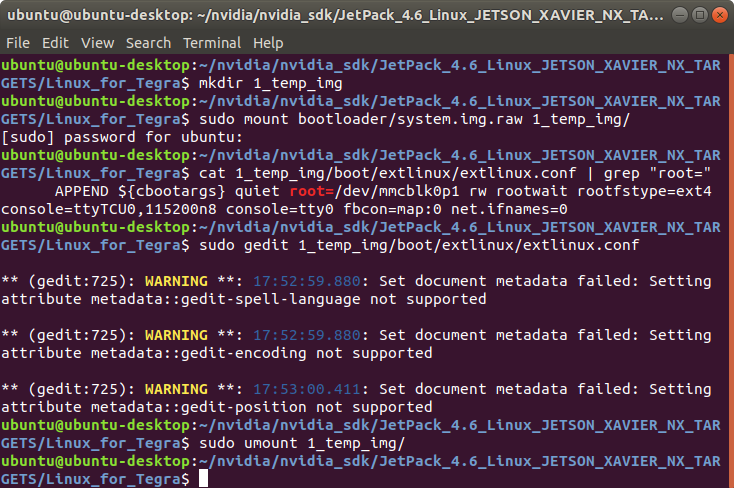
If the “root” parameter is not defined as “root=/dev/mmcblk0p1”, open this file with root privileges and modify it. Then, save it and exit to the text editor (if you have another text editor, please use it instead of gedit). Afterwards, unmount the image file.
sudo gedit 1_temp_img/boot/extlinux/extlinux.conf

sudo umount 1_temp_img/
rmdir 1_temp_img/
Move the RAW image as “.img”.
mv bootloader/system.img.raw bootloader/system.img

Restoring on Another Device
At this part, we will restore the internal image from host PC. Then, we will format the external drive and restore the external storage’s backup on Jetson.
Set the Jetson module (without external storage) in recovery mode and type “lsusb” on the host PC to check the Jetson connected in recovery mode. Then, flash the default system image.
• For AGX Xavier module, type this command below:
lsusb | grep 0955:7019
sudo ./flash.sh -r jetson-xavier mmcblk0p1
• For AGX Xavier Industrial module, type this command below:
lsusb | grep 0955:7919
sudo ./flash.sh -r jetson-agx-xavier-industrial mmcblk0p1
• For Xavier NX module, type this command below:
lsusb | grep 0955:7e19
sudo ./flash.sh -r jetson-xavier-nx-devkit-emmc mmcblk0p1
• For TX2 NX module, type this command below:
lsusb | grep 0955:7c18
sudo ./flash.sh -r jetson-xavier-nx-devkit-tx2-nx mmcblk0p1
• For Nano module, type this command below:
lsusb | grep 0955:7f21
sudo ./flash.sh -r jetson-nano-emmc mmcblk0p1
A few seconds later …
At the end of the script, the device will reboot. Get the host PC’s IP address for using it on the Jetson.
ip -br a
After the system reboots, power-off the Jetson. Mount the external storage and power on it again.
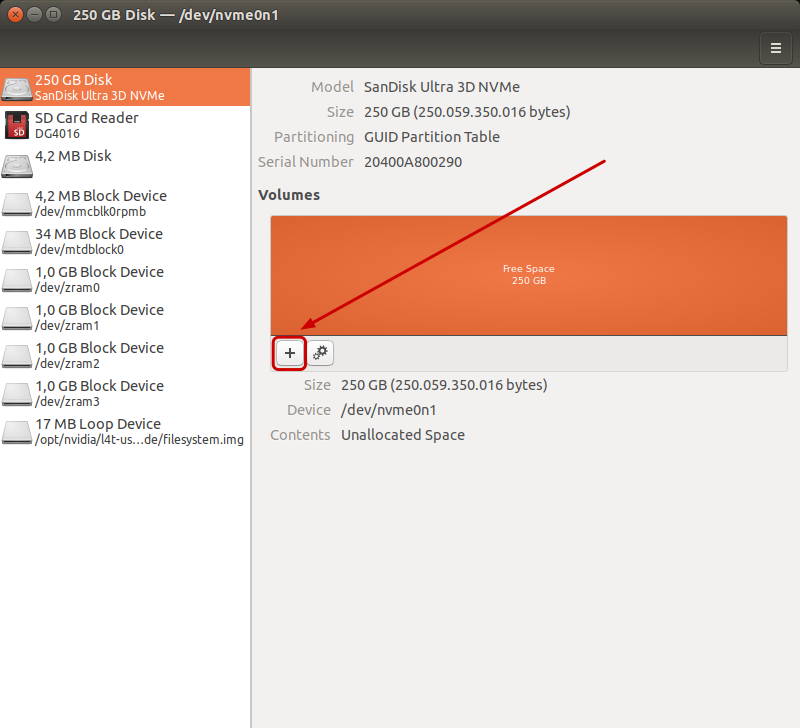
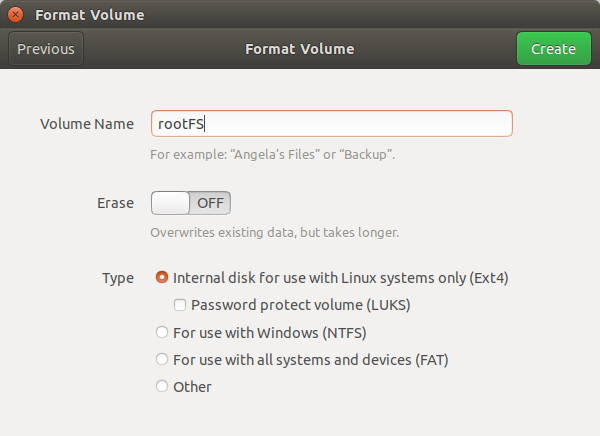
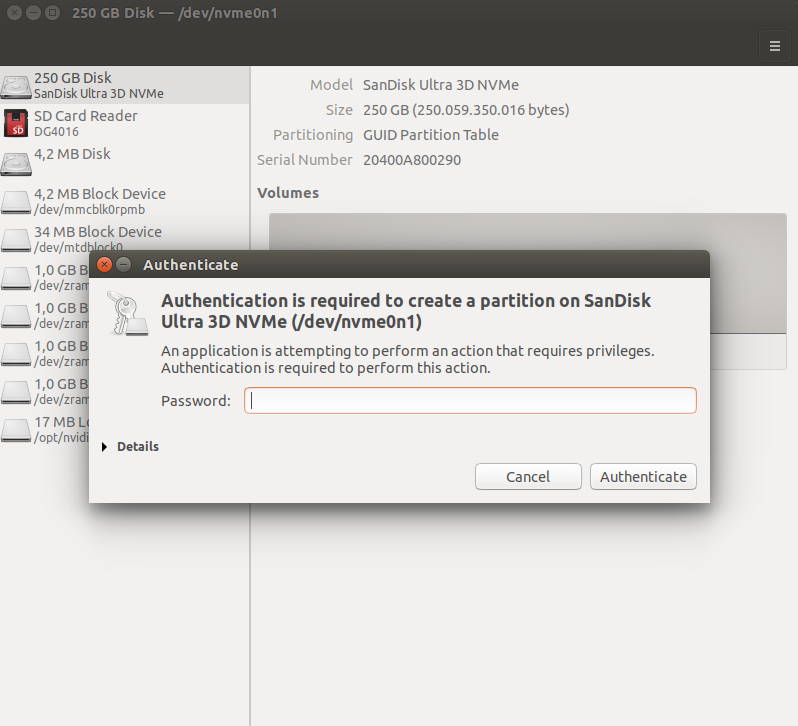
To the Jetson side, open “Disks” application (“gnome-disks” on terminal). Select the external drive to format it as “ext4”.


After the external storage formatted, get it’s device name and type these commands to mount it.
sudo mount {EXTERNAL_DEVICE} /mnt
df -h
At this point, we typed these commands (for NVME SSD drive) below:
sudo mount /dev/nvme0n1p1 /mnt
df -h

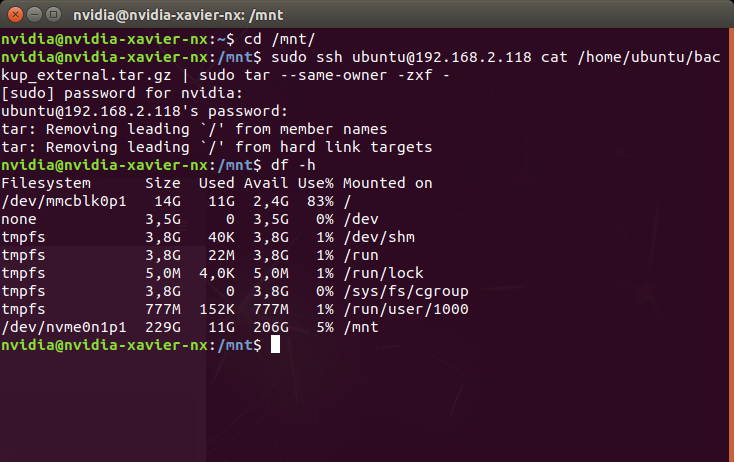
Afterwards, change the current directory on “/mnt”, extract the external storage’s backup from host PC to Jetson and check the external storage’s latest used size with these commands:
cd /mnt/
sudo ssh {USERNAME}@{IP_ADDRESS} cat {BACKUP_FOLDER}/backup_external.tar.gz | sudo tar --same-owner -zxf -
df -h
We extract it with these commands below (username:ubuntu, host PC’s IP address:192.168.2.118, backup folder: /home/ubuntu):
cd /mnt/
sudo ssh ubuntu@192.168.2.118 cat /home/ubuntu/backup_external.tar.gz | sudo tar --same-owner -zxf -
df -h
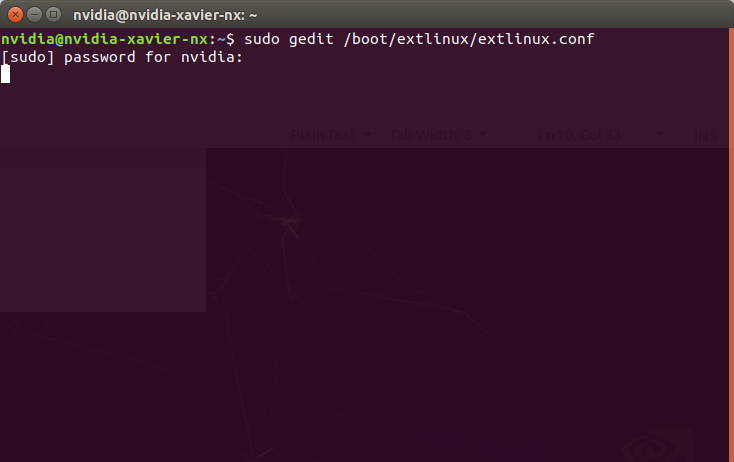
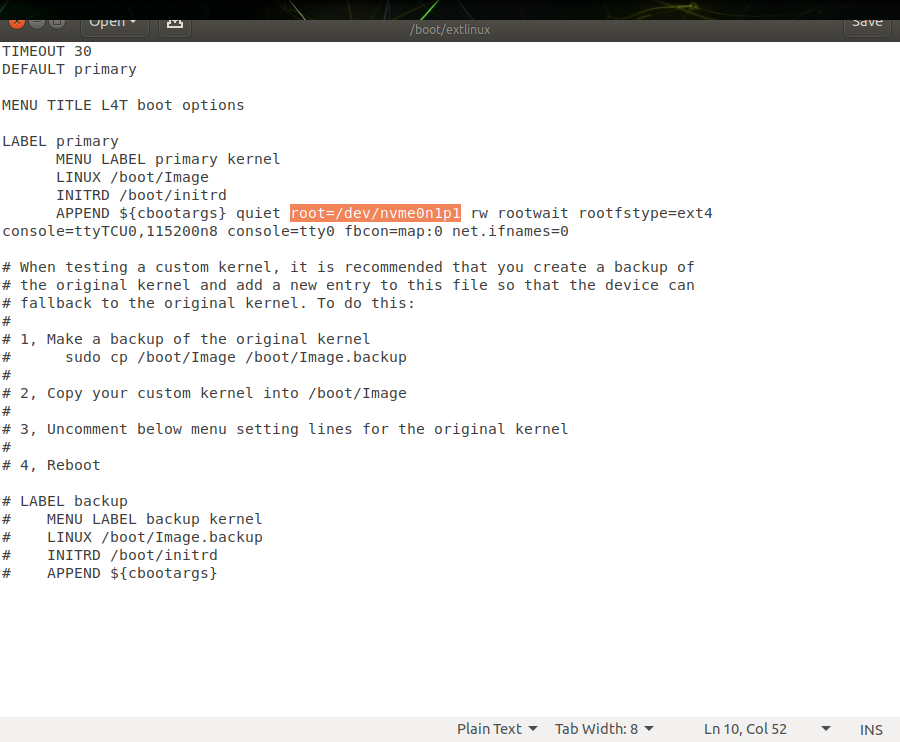
Open the “extlinux.conf” file from the internal storage, change the “root” parameter as the external storage’s device path, synhronize the cache files and reboot the system:
sudo gedit /boot/extlinux/extlinux.conf
sync
sudo reboot

After the Jetson rebooted, open a terminal and type “df -h” to check the external storage mounted as root file-system.

Thank you for reading our blog post.