How to Run Tensorflow Object Detection with Docker on NVIDIA Jetson™ Modules?
WHAT YOU WILL LEARN?
1- How to pull Docker Image from Nvidia NGC
2- How to configure Docker Container with using graphic interface
3- How to test TensorFlow environment with custom masked face detection model
ENVIRONMENT
Hardware: DSBOX-NX2
OS: JetPack 4.5 (L4T-32.5)
DOWNLOADS
How to pull Docker Image from Nvidia NGC
In this blog post, we are going to explain how to run TensorFlow Object Detection with Docker on Jetson Modules. The process will be the same for all Jetson Modules. This GitHub repo has been taken as a reference for the whole process.
Firstly, we must pull our docker image from this link. We will be using "NVIDIA L4T ML" image. You can just pull the image by typing the following command!
docker pull nvcr.io/nvidia/l4t-ml:r32.5.0-py3
For creating a Docker container, you should be typing the following command. We have passed display parameters because of getting image after object detection and we have passed "-rm" parameter for removing the container after exit the container.
sudo docker run -it --rm --gpus all -e DISPLAY=:0 -v /tmp/.X11-unix:/tmp/.X11-unix --network host nvcr.io/nvidia/l4t-ml:r32.5.0-py3
Now, we are inside of the container. We should clone the TensorFlow model repository like below.
apt update
apt-get install git
git clone https://github.com/tensorflow/models.git
We should change the working directory.
cd /models/research/object_detection/
Then, we need to pull the TensorFlow object detection API repository like below.
git clone https://github.com/EdjeElectronics/TensorFlow-Object-Detection-API-Tutorial-Train-Multiple-Objects-Windows-10.git
We need to copy the file of TensorFlow object detection API repository inside the "/models/research/object_detection" folder like below.
cp -r TensorFlow-Object-Detection-API-Tutorial-Train-Multiple-Objects-Windows-10/* .
rm -rf TensorFlow-Object-Detection-API-Tutorial-Train-Multiple-Objects-Windows-10/
We need to change the python version that we will be using for object detection.
alias python=python3
We have used the mask model which is trained before. If you would like to train your custom model, you can check this blog for training custom object detection model with TensorFlow.
You can find the trained model labelmap at the top of the post. You must get these models and label map inside the docker container.
wget https://hs.forecr.io/hubfs/tf_mask_model.zip
We must install unzip and use command on terminal to extract the zip file.
apt updateapt install unzip
unzip tf_mask_model.zip
We change the name of the files in the folder extracted.
mv frozen_inference_graph.pb ./inference_graph/
mv labelmap.pbtxt ./training/
Download the video that you can use with ‘wget’ command like below. (The Video (video.mp4) link is available at the top of this post.)
wget https://hs.forecr.io/hubfs/video.mp4
We have also changed the using video name on "Object_detection_video.py" file.
sed -i ‘s/test.mov/video.mp4/g’ Object_detection_video.py
Please pay attention to model, labelmap and video directories for avoiding possible problems.
On our NVIDIA machine (outside docker container), we need to give the access permission to everyone for avoiding display problems.
Open a new terminal and use ‘xhost +’ command.
xhost +
How to test TensorFlow environment with custom masked face detection model
Then we turn back to the first terminal that we use.
After modifying the model files, we are ready to run to detection on image.
cd ..
protoc object_detection/protos/*.proto --python_out=.
cd object_detection/
python3 Object_detection_video.py
You can see the screenshots below.
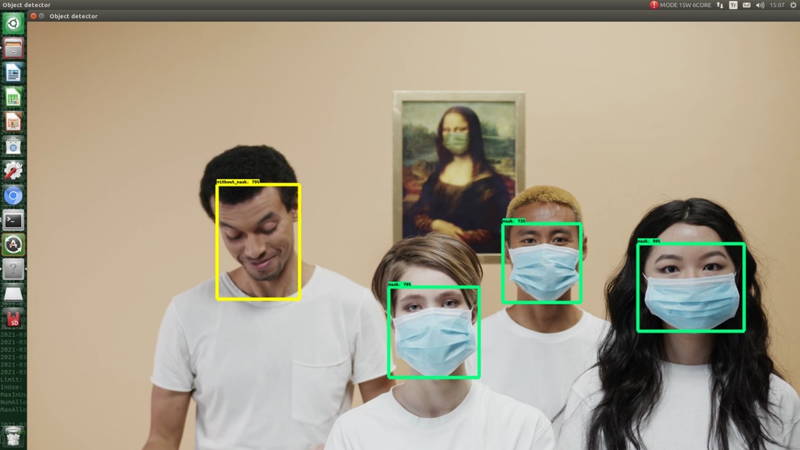
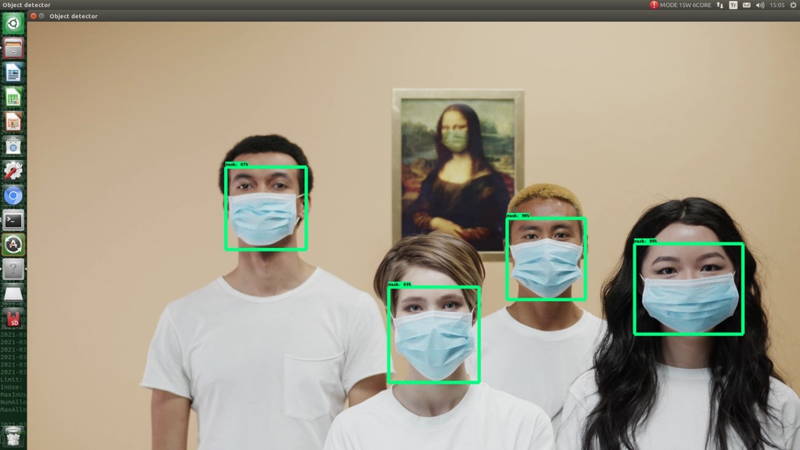
You can customize the detection image by changing the image name and path in "Object_detection_video.py" file. You can also run to detect model on images and webcam display.
Thank you for reading our blog post.