How to Increase Swap Space on Jetson Modules?
WHAT YOU WILL LEARN?
1- How to create the extra swap partition?
2- How to enable the swap partition?
3- How to remove the swap partiton?
ENVIRONMENT
Hardware: DSBOX-TX2NX with NVME SSD
OS: Jetpack 4.6
Language: BASH
In this blog-post, we will increase the swap memory size on Jetson. First, we will create the extra swap partition. Then, we will enable it & set it permanent. Finally, we will deactivate it & clear its partition.
Creating the Extra Swap Partition
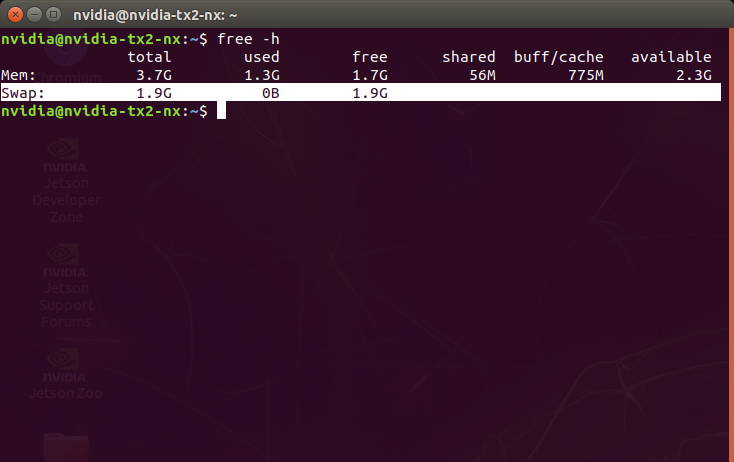
First, check the current swap size with the following command below:
free -h
Check the free storage on the system.
df -h

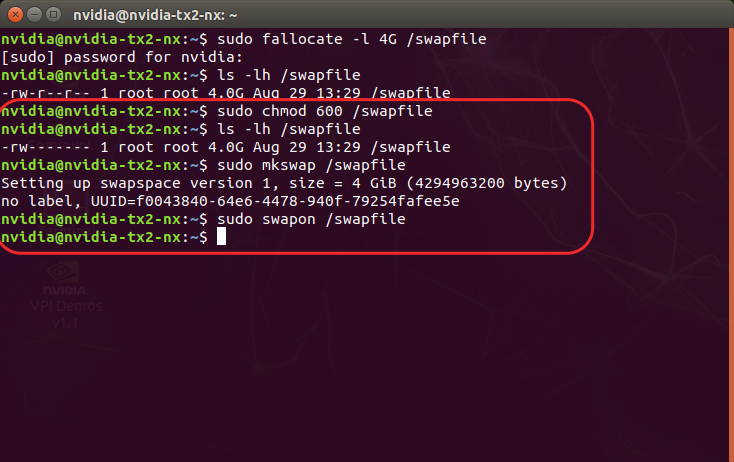
Then, create a partition & check its size (In this tutorial, we’ve created the extra swap file named as “swapfile”. It’s size is 4GB).
sudo fallocate -l 4G /swapfile
ls -lh /swapfile

Enabling the Swap Partition
Give only root privileges on the swap file to avoid other users’ access. Then, set it up as swap area & enable it.
sudo chmod 600 /swapfile
sudo mkswap /swapfile
sudo swapon /swapfile
Afterwards, check the all swap size to confirm it.
free -h

Now, get the /etc/fstab file’s backup & write the new swap partition on it for setting permanently.
sudo cp /etc/fstab /etc/fstab.bak
echo '/swapfile none swap sw 0 0' | sudo tee -a /etc/fstab

If you won’t need to use this swap partition later, you can remove it with the next section below.
Removing the Swap Partition
Check the current swap size & its definition at the /etc/fstab file on the Jetson.
free -h
cat /etc/fstab
Then, move the previous fstab file on the newer one & check it.
sudo mv /etc/fstab.bak /etc/fstab
cat /etc/fstab

Afterwards, deactivate the swap file & remove it.
sudo swapoff -v /swapfile
sudo rm /swapfile
free -h
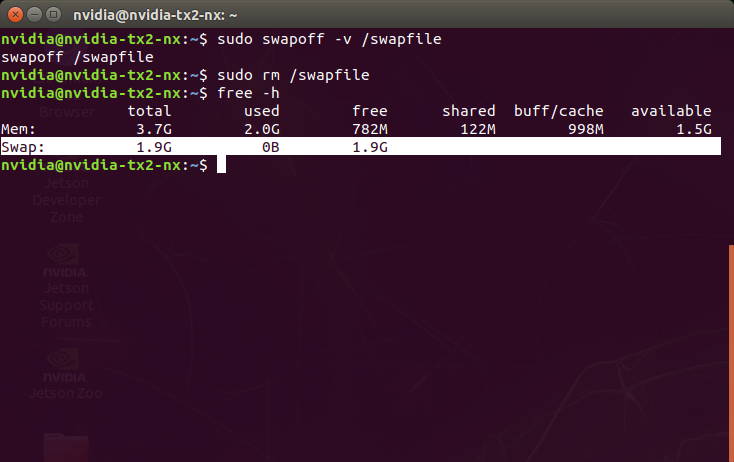
As you can see that, the extra swap partition removed successfully.
Thank you for reading our blog post.
For more information on our range of compatible systems for your Jetson modules, including the DSBOX-TX2NX, check out our collection of Industrial Box PCs designed to support Jetson modules like the TX2 NX and other Jetson modules